Procurement teams and systems integrators usually don’t fail because they “picked the wrong camera.” They fail because they bought the right device for the wrong job, in the wrong environment, with the wrong expectations about what it can actually show. This guide compares visible light, low light, and infrared thermal imaging in a way that matches how real projects get specified, tested, and deployed—whether you’re building a perimeter security package, supporting night patrol, running wildlife monitoring, or writing an RFQ for an outdoor imaging product line.
The goal here is not to sell you on a single technology. It is to help you decide what should do the detecting, what should do the identifying, and what should hold up when the weather, the lighting, and the schedule are less than perfect.
Most “technology comparison” articles stop at definitions. In the field, the questions sound more like: Can we see a person before they reach the fence? Can we tell if it’s staff or a trespasser at 120 meters? Can we collect enough detail to support an incident report? Can the system keep working when the site lights are off, the air is humid, and the scene has headlights and deep shadows?
Those questions map to three distinct tasks—detecting, recognizing, and identifying. If you treat them as the same thing, you’ll overspend in one place and underperform in another. A practical approach is to decide which imaging channel owns early warning, which one owns detail, and how your team will verify in real time without drowning in false alarms.
Detection is “something is there.” Recognition is “what category is it.” Identification is “this specific target, confidently.” In a typical perimeter job, detection needs to happen early and consistently. Identification needs to happen clearly, but only at the moments that matter. When you design around that reality, the visible channel and the infrared channel stop competing and start complementing each other.
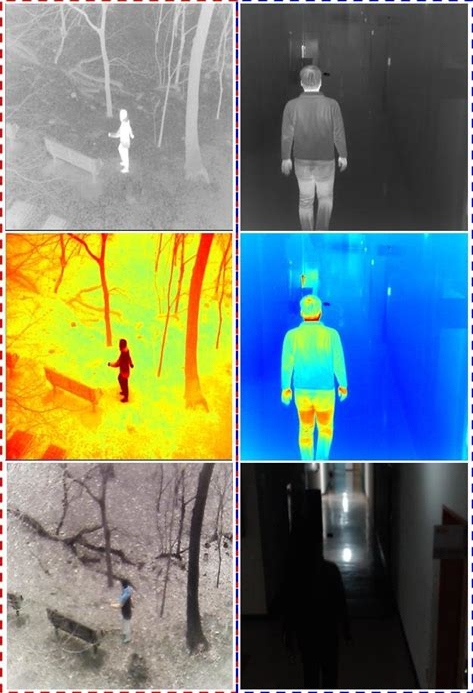
Visible imaging is still the backbone of most security and observation systems for one simple reason: it gives the kind of scene detail people understand instantly. Clothing color, printed text, vehicle markings, and facial structure are visible-light strengths, especially when lighting is stable and optics are appropriate.
What trips teams up is assuming “night is just day with less light.” Night introduces headlights, glare, deep shadows, mixed color temperatures, and sudden transitions when a subject moves under a lamp and then out again. If your site has bright entry points and dark gaps, you’ll care about wide dynamic range, sensible exposure behavior, and optics that don’t turn highlights into a washout.
If your requirement is evidence-grade detail—license plate context, uniform color, a clear view of hands or tools—visible imaging is often the fastest path. It also tends to integrate cleanly into existing VMS workflows because operators have spent years interpreting visible footage.
A visible camera can look great at noon and disappoint at 9 p.m. for reasons that are not obvious on a spec sheet. Glare off wet pavement, backlighting from signage, and intermittent shadows can create a stream of motion triggers with little usable detail. Prevention here is less about chasing marketing specs and more about testing the exact lighting environment—especially at the hours your incidents actually happen.
Low-light imaging sits in the messy middle. In dusk, early night, and poorly lit industrial yards, you often have some photons, just not enough for a conventional visible setup to hold detail without noise. Low-light systems aim to keep scenes readable when illumination is minimal, often by boosting sensitivity, improving processing, or pairing with near-infrared assistance depending on the design.
This matters in operations that cannot rely on turning lights on. Think of a logistics yard that wants to reduce light pollution, a rural facility with limited infrastructure, or a security plan that avoids advertising where the cameras are pointed.
If a system depends on active infrared illumination, it can work very well—but it introduces its own realities: range limits, reflectivity issues on glossy surfaces, and the possibility of being noticed by other sensors. Some teams prefer low-light solutions that remain effective without broadcasting an illumination source. Others accept illumination as a tradeoff because it simplifies operator viewing and improves perceived detail.
The key is to decide this deliberately. If the site has long sightlines, active assistance may not cover the full area evenly. If the scene is tight and controlled, it can be a straightforward win.
Low-light imaging often shines in applications where operators need familiar-looking scenes at night—security patrol, outdoor observation, and mobile deployment where lighting conditions change quickly. It can also support verification when a thermal alert indicates a target, and you need a clearer read of intent and context.
Thermal imaging doesn’t care about the color of a jacket or the brightness of a lamp. It detects differences in heat signatures, which makes it powerful for early detection in darkness and in many visually challenging conditions. If you’ve ever watched a guard struggle to interpret a grainy night scene, you understand why thermal is often chosen for first-line detection.
That strength comes with a tradeoff: thermal imaging is typically less intuitive for fine identity detail. You may detect a person quickly at range, but you may not identify them with the same confidence as a well-lit visible camera. In good system design, thermal often becomes the “alert and track” channel, while another channel carries the “detail and document” load.
If your environment is truly dark, if you cannot control lighting, or if you need consistent detection without depending on visible contrast, thermal often becomes the stabilizing piece of the system. It is commonly used for perimeter lines, remote sites, wildlife monitoring near assets, and search operations where time matters and the background is visually cluttered.
Thermal performance changes with weather, distance, lens selection, and scene temperature. A hot day can reduce contrast between a person and a warm background. Certain surfaces reflect heat in ways that confuse first-time users. Glass is another frequent surprise in real deployments. The prevention strategy is simple: plan for on-site validation in the exact conditions that matter, and specify expectations in terms of tasks—detection distance, recognition confidence, and operator workflow—rather than assuming the thermal view will look like a standard camera feed.
Img.Visible, Low-Light & Thermal Imaging.jpg
The most reliable systems rarely pick one technology and call it done. Instead, they assign roles.
This is common in perimeter security. Thermal imaging triggers and tracks. Visible or low-light confirms and documents. Operators get fewer useless alerts, and the footage they export is more persuasive when an incident becomes a report or a claim.
If a site has consistent low-level lighting—think parking facilities, access roads, or partially illuminated campuses—low-light imaging can be a solid primary channel at night, with thermal used as a secondary layer in high-risk zones or for long-range coverage.
For field teams, weight, battery behavior, and ease of interpretation matter as much as raw performance. Handheld thermal helps locate targets quickly. Low-light or visible helps confirm what the target is and what it’s doing. When teams work under time pressure, “fast to understand” becomes a real performance metric.
A strong RFQ avoids vague language like “high clarity” and instead defines what success looks like in the field.
Define the viewing distance, the lighting range, and the critical details you must capture. Include real-world constraints such as headlight glare, reflective surfaces, and backlit entry points. Mention whether the system must handle mixed lighting without constant manual tuning.
Ask how the system behaves at the lowest expected illumination, and whether performance depends on any active assistance. If you need discretion, specify that requirement up front. Also clarify whether the scene needs true-to-life rendering for operator judgment, or whether a more processed look is acceptable.
Treat lens choice as a design decision, not an afterthought. Field of view, focal length, and target distance define whether you’re building a wide-area detection layer or a narrower long-range watch zone. Include operational needs like refresh behavior for moving targets, and how the device supports quick deployment or integration into a larger system.
If you’re sourcing for resale or a branded product line, you should also decide early whether you need customization on housing, labeling, packaging, and documentation—those details often determine whether a product is ready for channel partners.
For a broad view of available categories, you can reference Hemusun’s full product lineup. If your project requires configuration or private-label adaptation, review customisable device options to align production capability with your specification approach.
A lot of post-install frustration comes from predictable gaps.
One gap is testing only in “nice” conditions. A camera that looks fine in dry weather can behave differently in humidity, rain, or rapid temperature shifts. Another gap is assuming one channel can satisfy both detection and evidentiary detail across all distances. When operators complain that they “can’t tell what they’re seeing,” it is often because the system wasn’t designed with a clear handoff between channels.
The easiest prevention is to write a short operational scenario into the spec: the hour, the lighting, the target distance, and the action you want operators to take. If the vendor can demonstrate that scenario cleanly, the odds of a successful deployment rise dramatically.
Hemusun Optical Instrument Co., Ltd. focuses on research, development, manufacturing, and supply of optical and outdoor optronics equipment, serving both project-based buyers and channel partners who need stable product lines. In addition to standard catalog offerings—covering observation optics and night-use imaging devices—the company also supports customisable builds for customers who require tailored optical components, product configuration, or branded deliverables.
If you want background on the company’s scope and direction, see Hemusun’s company profile.
Visible, low-light, and thermal imaging are not competing answers to the same question. They are different tools for different tasks. Visible imaging delivers familiar, high-detail scenes when lighting cooperates. Low-light imaging covers the in-between hours and semi-lit sites where operators still need context without flooding the area with lighting. Thermal imaging offers dependable detection when light is unreliable, helping teams spot what matters early and reduce the noise that wears operators down.
The fastest way to a good purchase decision is to define outcomes in operational terms—detect, recognize, identify—then assign each imaging channel a job it can perform consistently. When you do that, your RFQ reads like a deployment plan instead of a wish list, and your final system behaves like something your operators can trust on the nights when conditions are at their worst.
Visible imaging captures scene detail people easily recognize, but it depends on illumination. Low-light imaging improves usability in dim conditions and can reduce reliance on strong lighting, depending on the design. Infrared thermal imaging detects heat contrast, so it can deliver reliable detection in darkness or visually cluttered scenes, though it may not provide the same identity-level detail as visible footage.
For many perimeter deployments, thermal imaging is a strong choice for early detection and tracking, especially where lighting is inconsistent or intentionally limited. Low-light imaging can work well in semi-lit environments and can provide more familiar-looking scenes for verification. Many B2B deployments use thermal to detect and a visible or low-light channel to verify and document.
Yes, thermal imaging can work in daylight because it is not based on visible illumination. What changes is contrast: on hot days, backgrounds can warm up and reduce the temperature difference between targets and surroundings. In procurement terms, the right approach is to validate performance in the actual daytime conditions your site experiences, not only during ideal test windows.
Sometimes, but it is uncommon in demanding outdoor use. Detection at longer ranges often favors thermal imaging, while identification-grade detail often favors visible imaging under good lighting or low-light imaging in controlled night conditions. If you require both early detection and clear identification across varying environments, a layered design is usually the more reliable path.
Describe scenarios, not slogans. Specify target type, distance, time of day, expected lighting, and what operators must decide. Then map those tasks to technology roles: visible for evidentiary detail, low-light for dim-context viewing, and infrared thermal imaging for dependable detection when light is poor. If you need private-label or configuration changes, include customization requirements early so the supplier can quote accurately.